BT-PON BT-G711AX
Hardware Specifications
| Vendor/Brand | BT-PON |
| Model | BT-G711AX |
| Chipset | Realtek RTL9607Cv2 (Realtek RTL8198D is mentioned too in boot log???) |
| Flash | SPI NAND 128MiB (Winbond W25N01GVZEIG) |
| RAM | DDR3 256MiB |
| CPU | Formosa MIPS interAptiv (multi) V2.0 |
| CPU Clock | 1150MHz |
| Wireless | RTL8192XBR 2x2 2.4Ghz (bgn+ax), RTL8832BR 2x2 5Ghz (an+ac+ax) |
| Bootloader | U-Boot 2020.01 |
| System | Linux 4.4.140 (Realtek MSDK-4.8.5p1 Build 3068) |
| Load addr | 80010000 |
| Ethernet ports | 4x1G |
| POTS ports | 1xRJ11 (Si32192) |
| Optics | SC/UPC (SEMTECH GN25L95) |
| IP address | 192.168.1.1/24 |
| Web Gui | ✅ user admin, password YnQtcG9u OR user useradmin, password 123456 |
| SSH | NO |
| Telnet | ✅ user supertelnet, password supertelnet |
| FTP | ✅ port 21 |
| Serial | ✅ |
| Serial baud | 115200 |
| Serial encoding | 8-N-1 |
| Form Factor | ONT |
Serial
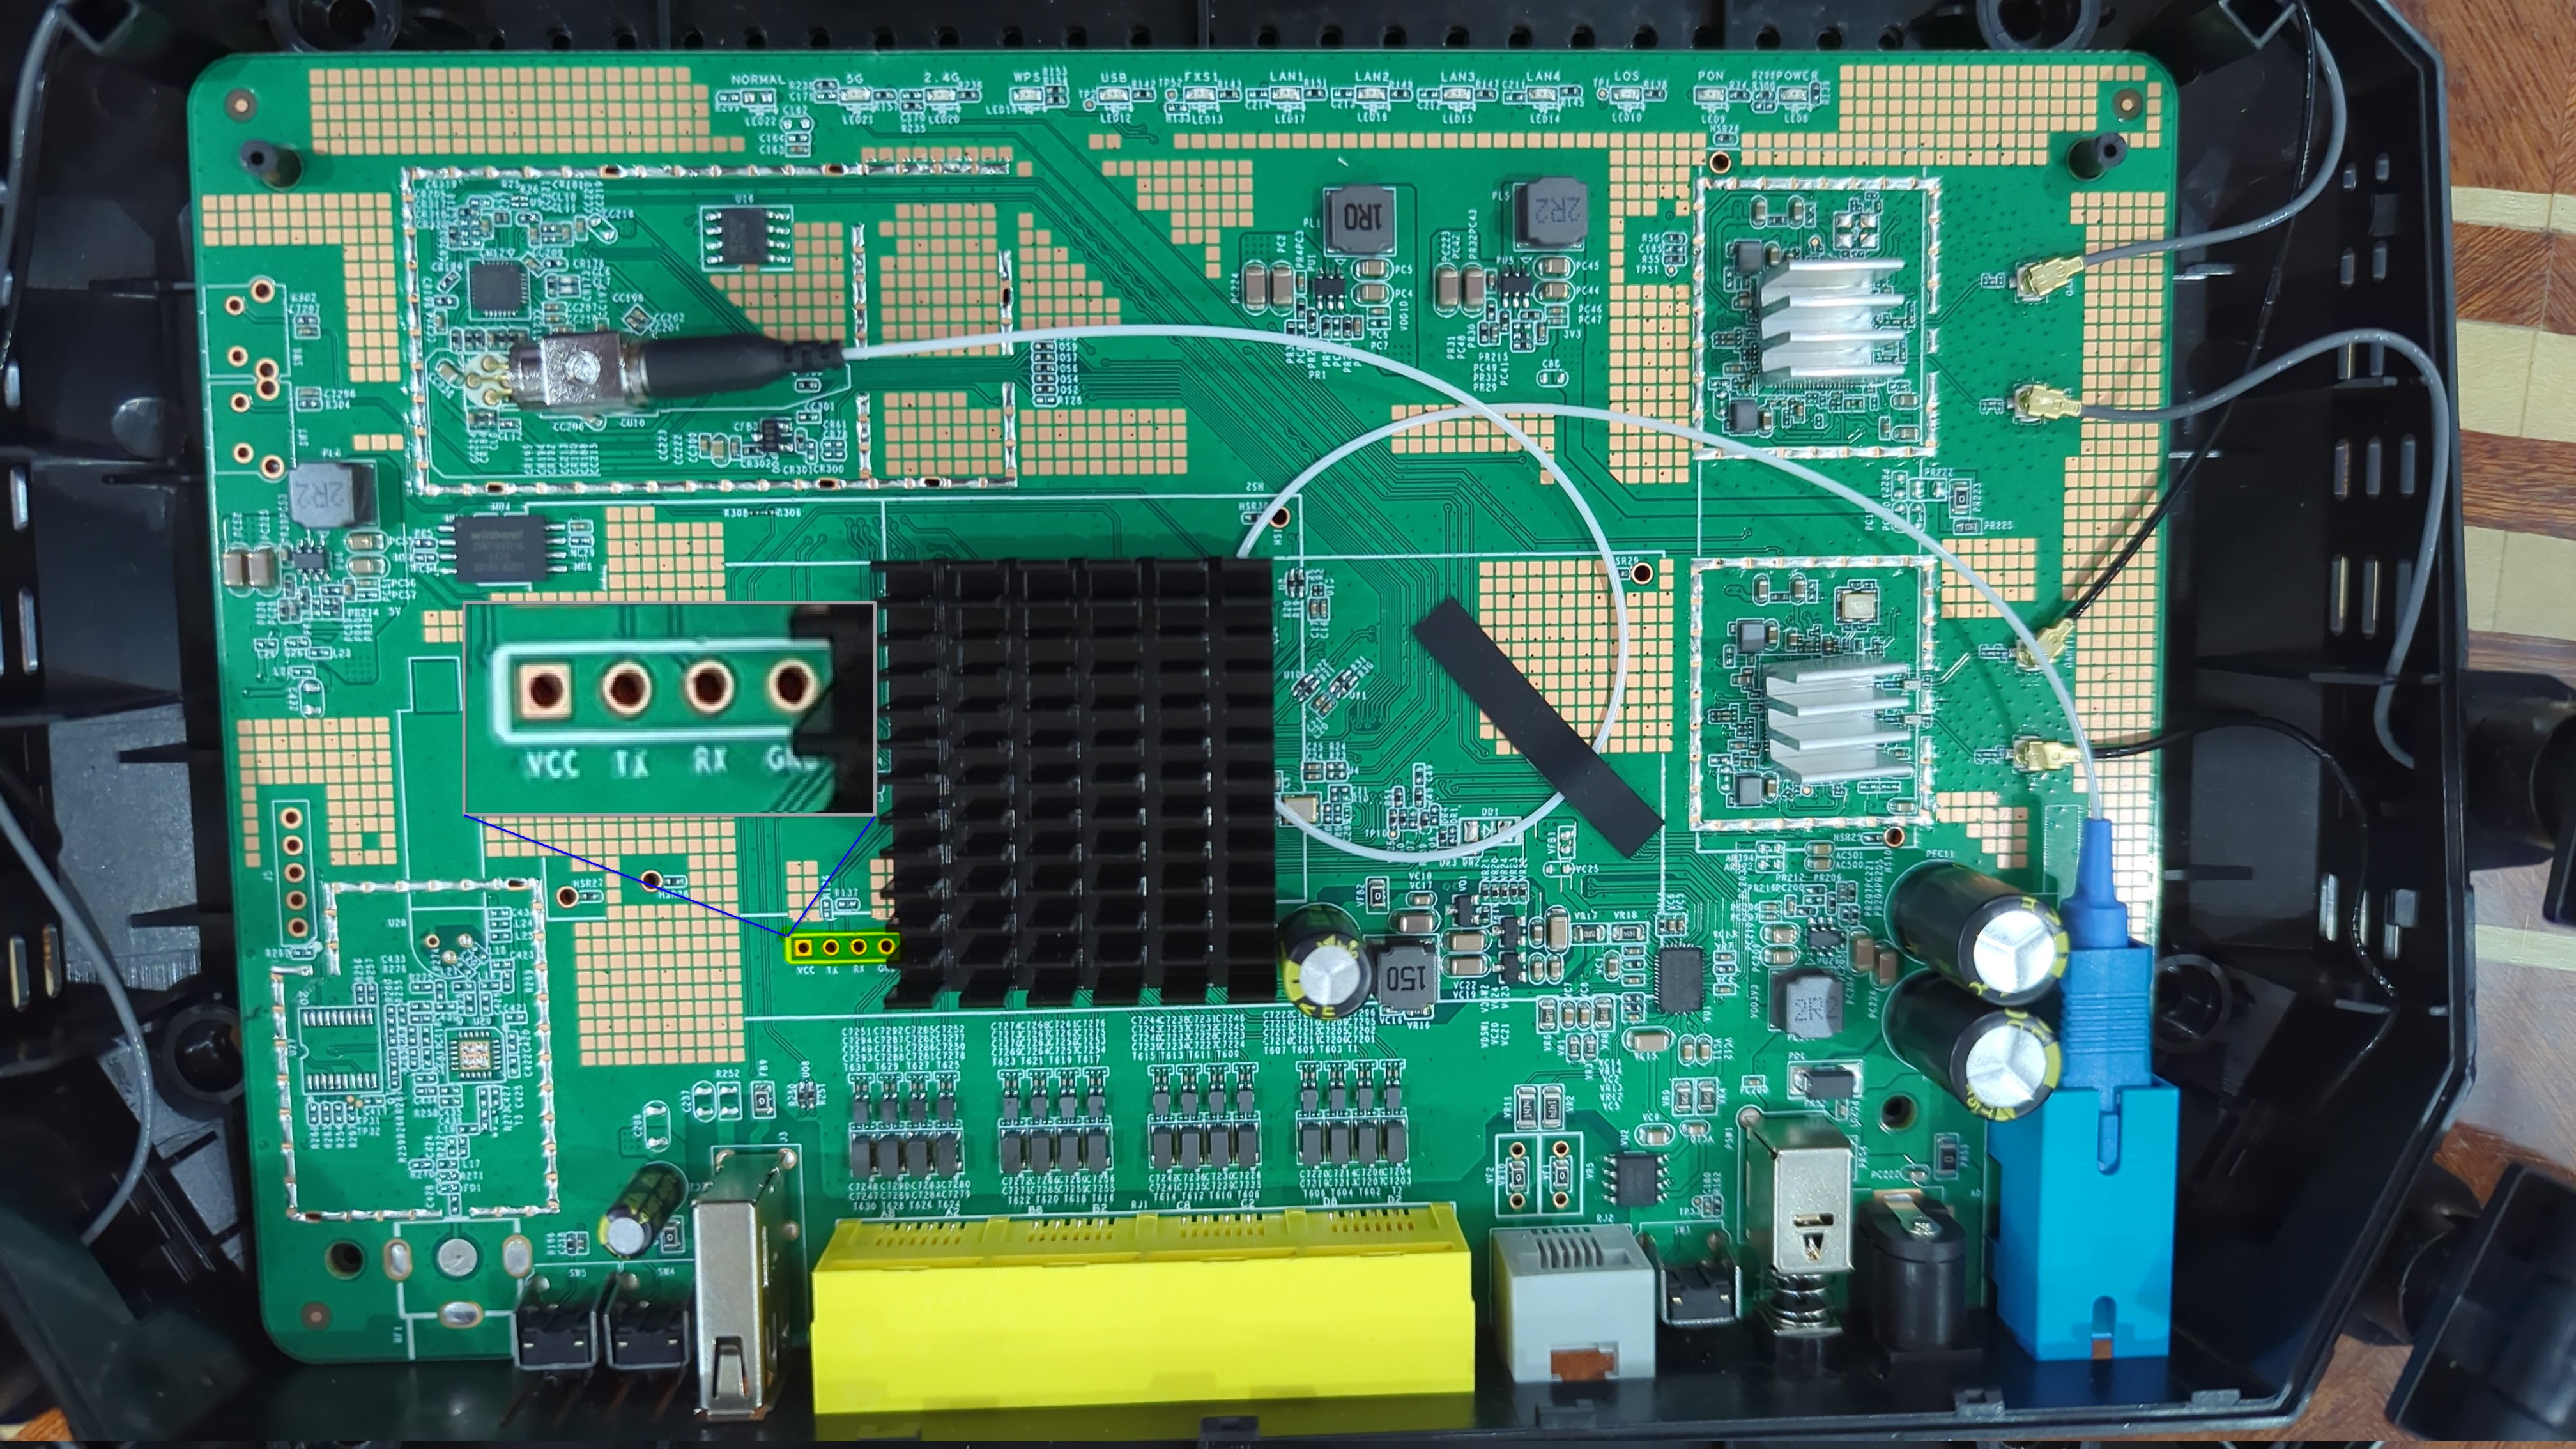
You can easily communicate with the ONT using a TTL converter (for example the CH341A programmer in TTL mode) by connecting the converters’ pins to the ONT following the pinout shown in the image above.
Once everything is ok, any TTY client, such as PuTTY, can be used to open the connection with its baud rate set to 115200. At this point, the ONT can be turned on.
Press any key once you see Hit any key to stop autoboot (You only have 1 second to do this so be quick) after which you get access to bootloader console which looks like this:
Phoebus#
List of partitions
cat /proc/mtd
| dev | size | erasesize | name |
|---|---|---|---|
| mtd0 | 000e0000 | 00020000 | “boot” |
| mtd1 | 00020000 | 00020000 | “env” |
| mtd2 | 00020000 | 00020000 | “env2” |
| mtd3 | 00020000 | 00020000 | “static_conf” |
| mtd4 | 07c40000 | 00020000 | “ubi_device” |
| mtd5 | 00a89000 | 0001f000 | “ubi_Config” |
| mtd6 | 00a0d000 | 0001f000 | “ubi_k0” |
| mtd7 | 01911000 | 0001f000 | “ubi_r0” |
| mtd8 | 00a0d000 | 0001f000 | “ubi_k1” |
| mtd9 | 01911000 | 0001f000 | “ubi_r1” |
Only the first 4 partitions with erasesize 0x20000 should be manipulated using mtd devices, the fifth partition ubi_device contains the rest of the NAND and is to be manipulated using ubi volumes
List of volumes (UBI)
ubinfo -a
| dev | size | type | name |
|---|---|---|---|
| ubi0_0 | 11046912B | dynamic | “ubi_Config” |
| ubi0_1 | 10539008B | dynamic | “ubi_k0” |
| ubi0_2 | 26284032B | dynamic | “ubi_r0” |
| ubi0_3 | 10539008B | dynamic | “ubi_k1” |
| ubi0_4 | 26284032B | dynamic | “ubi_r1” |
To back up a volume, cat or dd the appropriate /dev/ubi0_X device to a file or pipe, to restore a volume, use the ubiupdatevol utility (or just do it safely via the WebGUI)
This ONT supports dual boot.
Volumes ubi_k0 and ubi_r0 respectively contain kernel and rootfs of the first image, while ubi_k1 and ubi_r1 contain kernel and rootfs of the second one.
Useful files and binaries
Useful files
/var/config/config.xml- Contains the user portion of the configuration/var/config/config_hs.xml- Contains the “hardware” configuration (which should not be changed)/tmp/omcilog- OMCI messages logs (must be enabeled, see below)
Useful binaries
flash- Used to manipulate the config files in a somewhat safe mannernv- Used to manipulate nvram storage, including persistent config entries vianv setenv/nv getenvomcicli- Used to interact with the running OMCI daemonomci_app- The OMCI daemondiag- Used to run low-level diagnostics commands on the stick
Usage
Enable telnet
Telnet should be enabled by default but if that is not the case, you can enable it by editing configuration file you get in the Web UI. Go to Admin -> Backup and Restore Settings -> Backup Settings to File to get the config file in xml format and find MIB_TELNET_ENABLE and its value to 1. There is also telnet and telnet_port under ACL_IP_TBL, you should set these to 2 and 23 respectively.
ssh and ssh_port in there but changing these doesn’t do anything for enabling SSH, most likely due to lack of ssh capability of this ONT After logining in using the credentials in the table above, use the su command to gain root access to the shell.
$ su
#
GPON ONU status
Getting the operational status of the ONU
diag gpon get onu-state
Getting OLT vendor information
# omcicli mib get 131
Querying a particular OMCI ME
# omcicli mib get MIB_IDX
GPON/OMCI settings
Getting/Setting ONU GPON Serial Number
# flash get GPON_SN
GPON_SN=TMBB00000000
# flash set GPON_SN TMBB0A1B2C3D
Getting/Setting ONU GPON PLOAM password
# flash get GPON_PLOAM_PASSWD
GPON_PLOAM_PASSWD=AAAAAAAAAA
# flash set GPON_PLOAM_PASSWD AAAAAAAAAA
Getting/Setting ONU GPON LOID and LOID password
# flash get LOID
LOID=user
# flash set LOID user
# flash get LOID_PASSWD
LOID_PASSWD=user
# flash set LOID_PASSWD user
Getting/Setting OMCI software version (ME 7)
# flash get OMCI_SW_VER1
OMCI_SW_VER1=YOURFIRSTSWVER
# flash set OMCI_SW_VER1 YOURFIRSTSWVER
# flash get OMCI_SW_VER2
OMCI_SW_VER2=YOURSECONDSWVER
# flash set OMCI_SW_VER2 YOURSECONDSWVER
Getting/Setting OMCI hardware version (ME 256)
# flash get HW_HWVER
HW_HWVER=V2.0
# flash set HW_HWVER MYHWVERSION
Getting/Setting OMCI vendor ID (ME 256)
# flash get PON_VENDOR_ID
PON_VENDOR_ID=ZTEG
# flash set PON_VENDOR_ID HWTC
Getting/Setting OMCI equipment ID (ME 257)
# flash get GPON_ONU_MODEL
GPON_ONU_MODEL=DFP-34X-2C2
# flash set GPON_ONU_MODEL DFP-34X-XXX
Getting/Setting OMCI OLT Mode and Fake OMCI
Configure how ONT Stick handle OMCI from OLT:
# flash get OMCI_OLT_MODE
OMCI_OLT_MODE=1
# flash set OMCI_OLT_MODE 2
| Value | Note | OMCI Information |
|---|---|---|
| 0 | Default Mode | Stock setting, some values cannot be changed |
| 1 | Huawei OLT Mode | Huawei MA5671a |
| 2 | ZTE OLT Mode | ZTE |
| 3 | Customized Mode | Custom Software/Hardware Version, OMCC, etc… |
Some vendors/wholesale providers/ISPs have explicit LAN Port Number provisioning or proprietary OMCI that the stick cannot understand, this will make the stick reply OK to whatever the OLT sends it via OMCI.
0 = Disable, 1 = Enable, Default is 0
# flash get OMCI_FAKE_OK
OMCI_FAKE_OK=0
# flash set OMCI_FAKE_OK 1
Advanced settings
Transferring files to/from the router
This router has a capability of sharing files using ftp, tftp and netcat.
Setting management MAC
# flash get ELAN_MAC_ADDR
ELAN_MAC_ADDR=xxxxxxxxxxxx
# flash set ELAN_MAC_ADDR xxxxxxxxxxxx
Setting management IP
# flash get LAN_IP_ADDR
LAN_IP_ADDR=192.168.2.1
# flash set LAN_IP_ADDR 192.168.1.1
Rebooting the ONU
reboot
Getting/Setting the MTU of the L2 bridge
# diag switch get max-pkt-len port all
Port Speed
----------
0 1538
2 2031
# diag switch set max-pkt-len port all length 2000
Checking the currently active image
# nv getenv sw_active
sw_active=1
# nv getenv sw_version0
sw_version0=V1_7_8_210412
# nv getenv sw_version1
sw_version1=V1_7_8_210412
Booting to a different image
# nv setenv sw_commit 0|1
# reboot
Miscellaneous Links
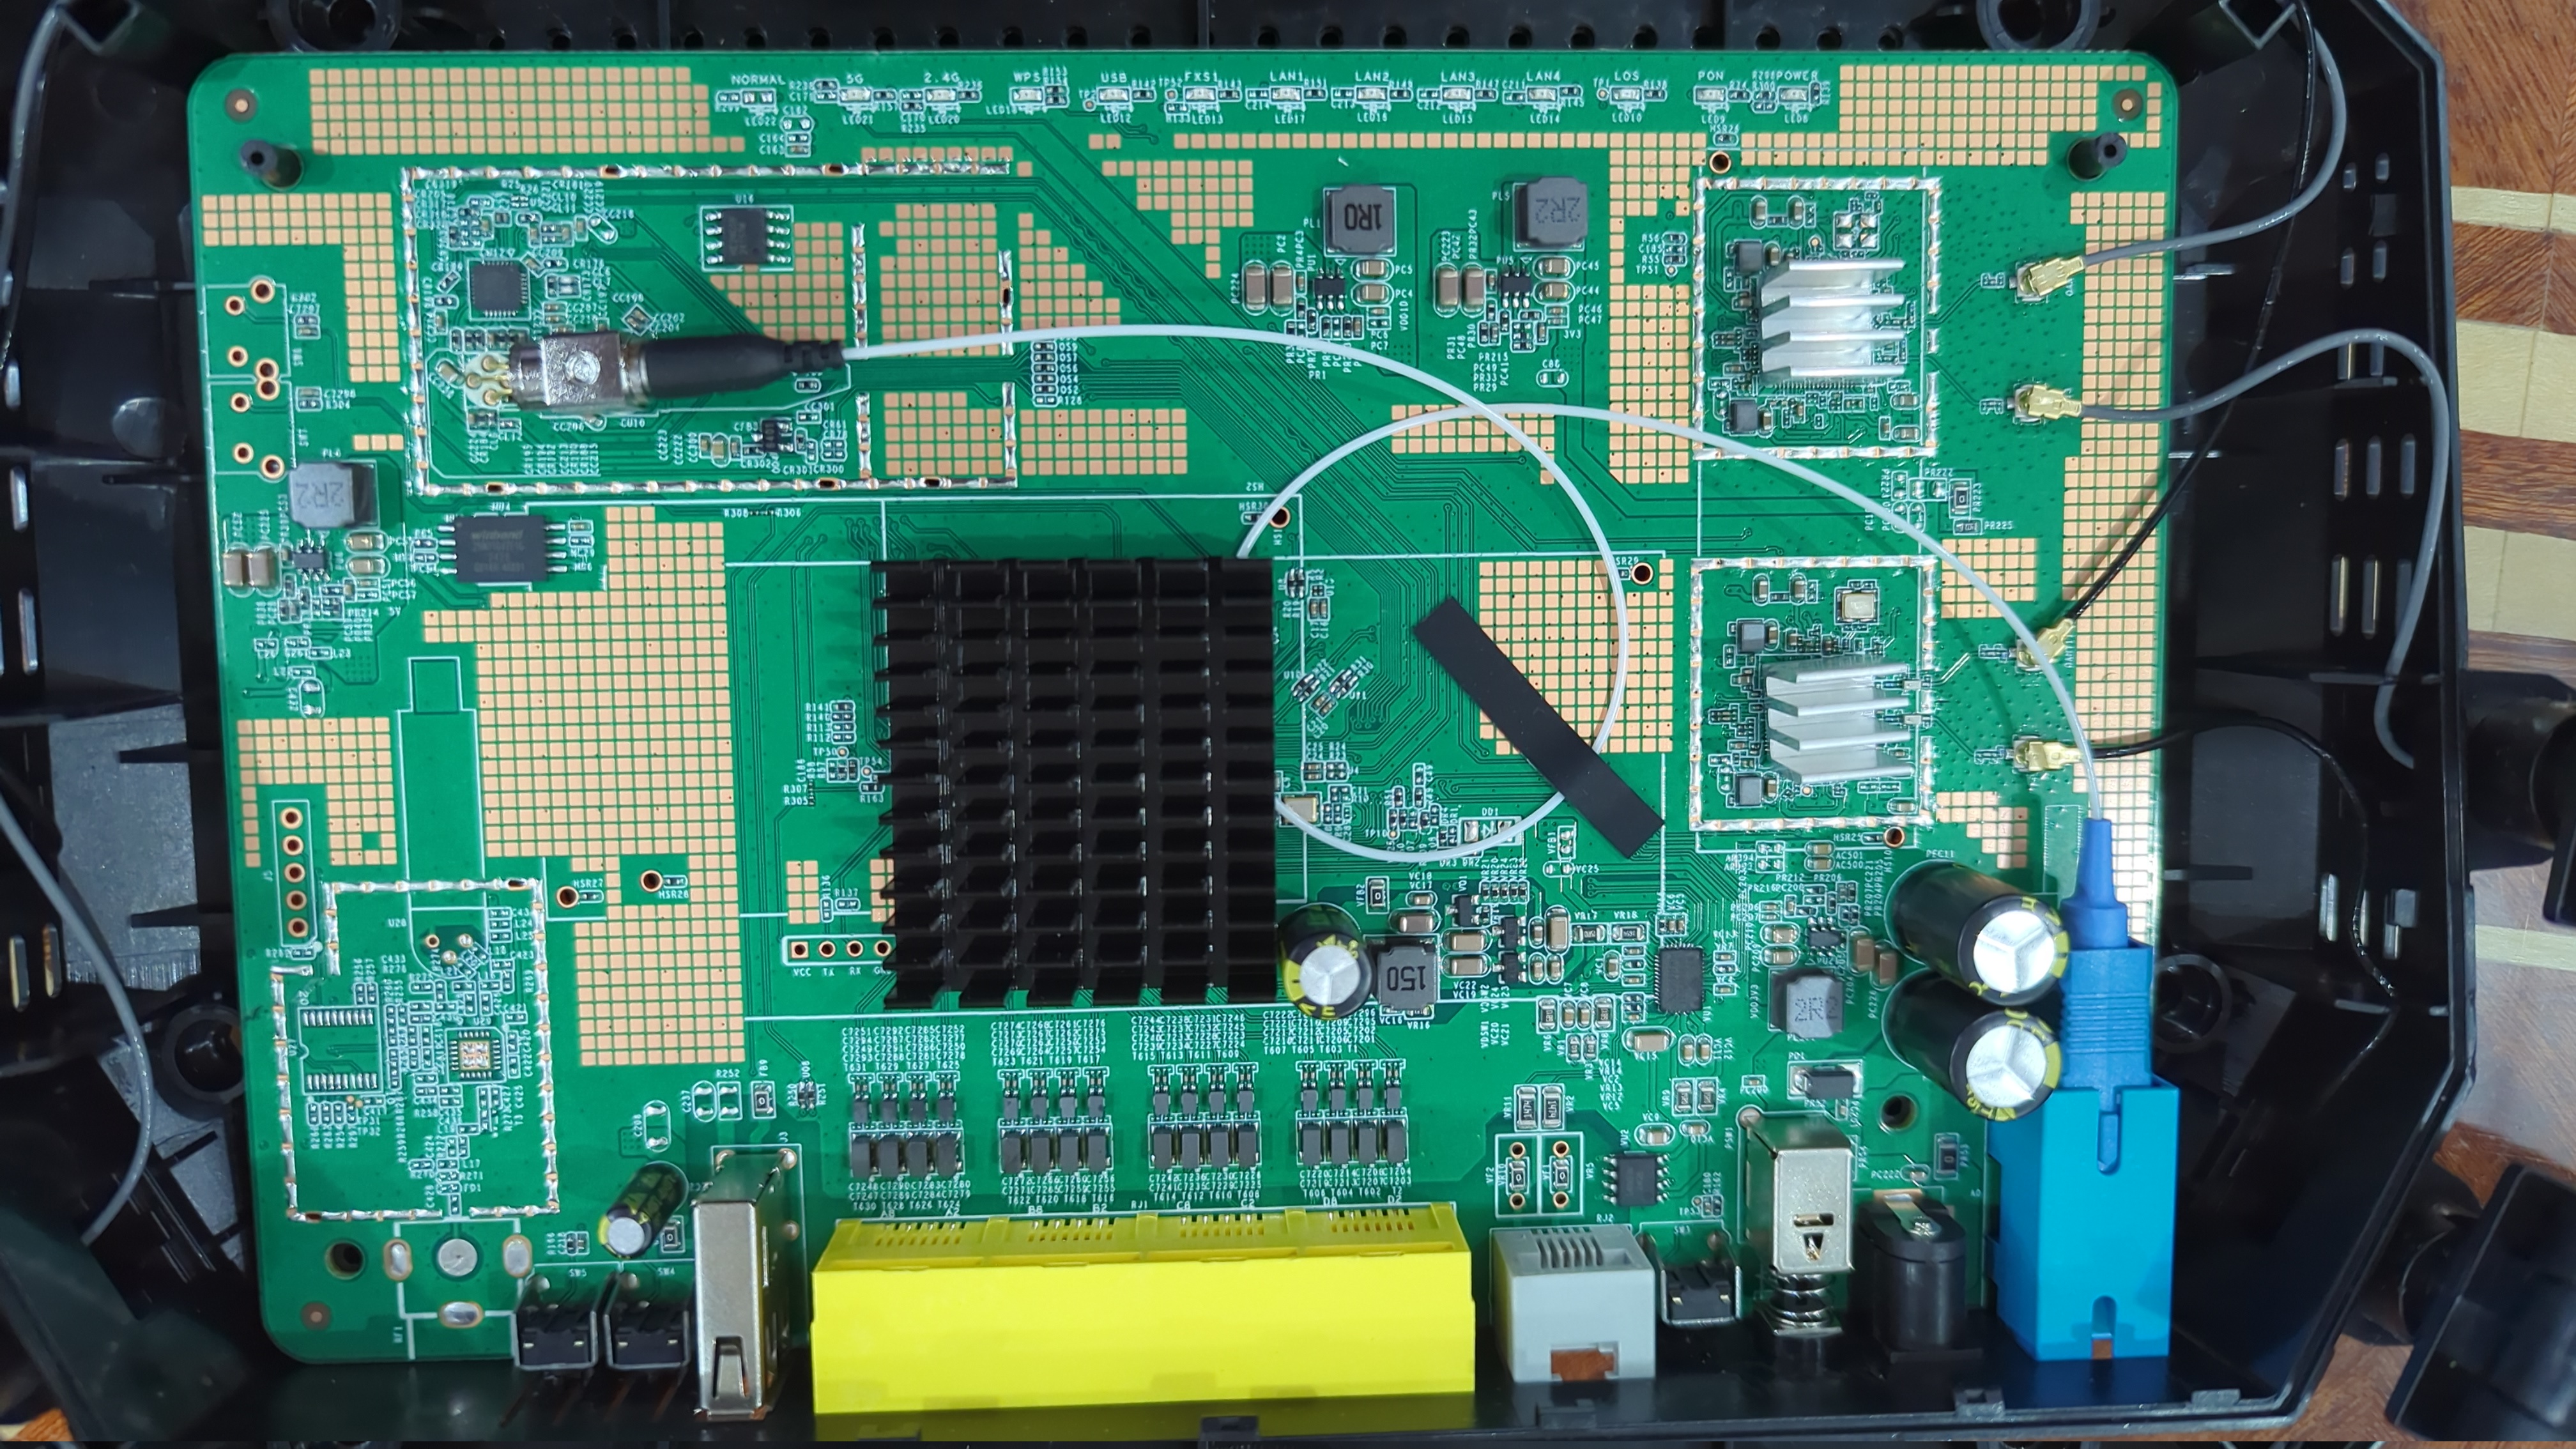
Theardown and other photos